
WordPress is a platform that lets your blog or website expand and change in almost any way you need. No matter if you want to add a shop, forum, or a small functionality, it all can be done just by adding a proper plugin. It does not require any coding skills, and it is easy! In this post, we will explain how in a few clicks, you can add plugins in WordPress
What is a plugin?
I once heard plugin be compared to an “app” for a smartphone – if that helps you visualize. Plugins can extend WordPress to do almost anything you can imagine. In the WordPress Plugin Directory, you can find, download, rate, and comment on all the best plugins the WordPress community has to offer.
Popular Plugins
Some of the most popular plugins that I’ve used and seen used are the following:
Google Analytics for WordPress
Track your WordPress site easily and with lots of metadata: views per author & category, automatic tracking of outbound clicks and pageviews
Contact Form 7
Just another contact form plugin. Simple but flexible.
Google XML Sitemaps
This plugin will generate a special XML sitemap which will help search engines to better index your blog.
All in One SEO Pack
Automatically optimizes your WordPress blog for Search Engines (Search Engine Optimization).
Smart Slider
My favorite slider! I will always recommend it as it saved me a lot of time.
How to add plugins in WordPress
Now let’s get to the main topic – adding plugins to your WordPress site. The first thing you will need to do is log into your Dashboard. Once there, there are a few ways in which you can proceed. In this post, I will focus on the two most popular ones.
Adding plugin automatically (for beginners)
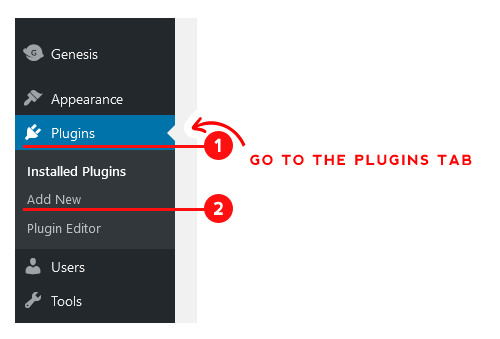
In your WordPress Dashboard, go to the Plugins tab on the left and pick the ‘ Add new‘ button.
Once there, navigate to the search box located in the top right corner and enter the name of the plugin you would like to install
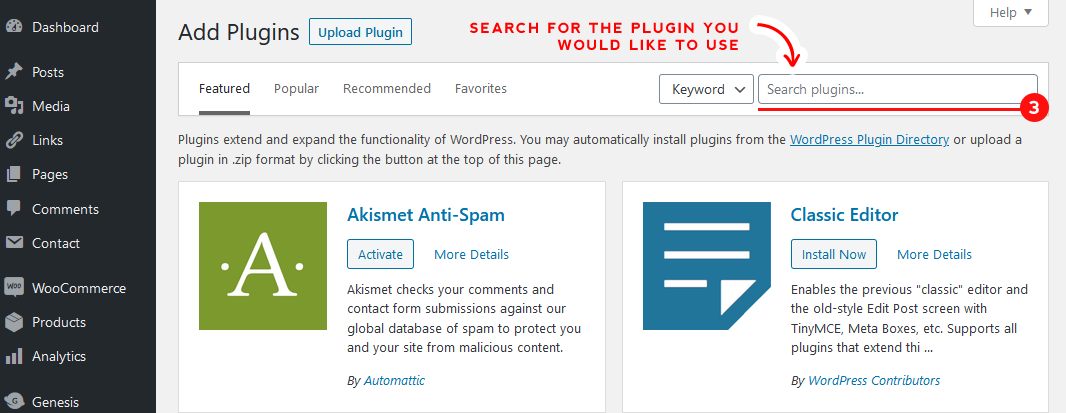
Plugins containing the words you typed should appear in the area just below the search box.
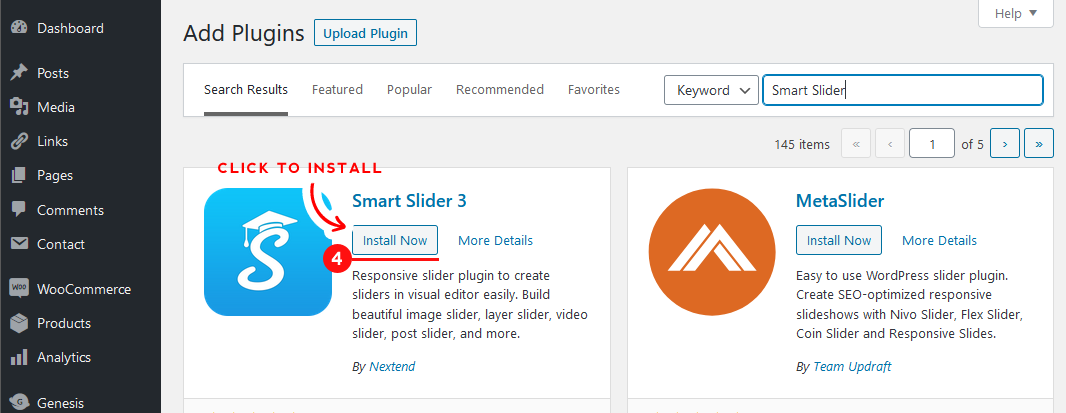
For this post, I was searching for the plugin called Smart Slider. When the plugin you need appears, all you need to do is click the ‘Install Now‘ button next to it.
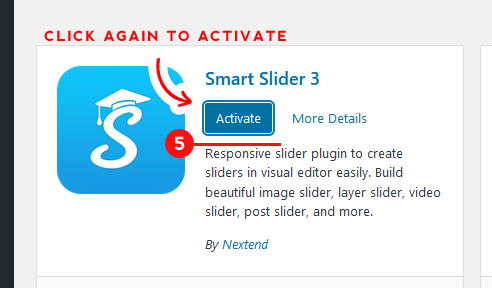
After a moment, the ‘Install Now‘ button should change to the blue ‘Active‘ button. Click it to make the plugin active for your WordPress.
Important!
The general rule of the thumb is that all plugins which you can find in your Plugins tab are safe to install. However, you should always keep an eye on the bottom area of each plugin box.

It will tell you if the plugin is popular when it has its last update and if it is compatible with your WordPress version. You should always pick plugins that are compatible and have been updated recently unless you know the plugin you are installing can not be replaced with a different one.
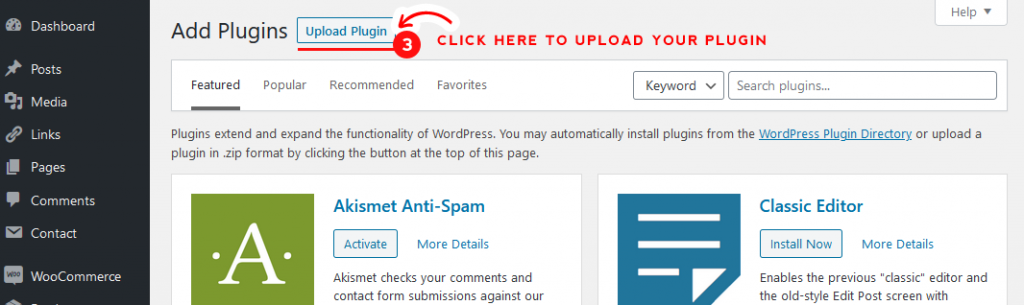
Adding plugin manually
The second option is a little bit more advanced and lets you add plugins to WordPress even if it is not listed in the plugins tab. Usually, it will be just a premium version of a plugin you purchased or a custom made plugin.
It starts the same as the previous option. You need to log in to your WordPress and go to the Plugins tab on the left. From the drop-down menu again pick ‘Add New‘.
Now, instead of going to the search box in the top right corner, navigate to the ‘Upload Plugin‘ button on the top.
Once you click it, you will see a new window below. Click ‘Choose file‘ to browse your computer for a plugin file. It should be in a .zip file format.
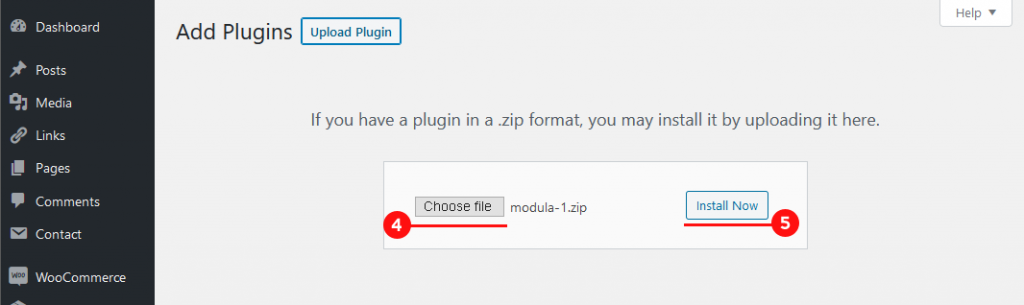
When you have the right file, click ‘Install Now’ on the right and wait a moment until you will be redirected to a new window with the activate button.
That’s all! Your new plugin is now installed
Remember to keep all your plugins and WordPress updated!
Learn how you can check for updates and perform them from our tutorial
If you have any questions on this tutorial or you have any ideas for future tutorials, please email us at [email protected].


Leave a Reply