
Our $15 Blogger templates are a great way to get a stylish blog look in less than a few minutes. One of the customizations included with our blog templates is a styled profile area. Styled means that we code the default Blogger profile gadget so it looks more custom and pretty.
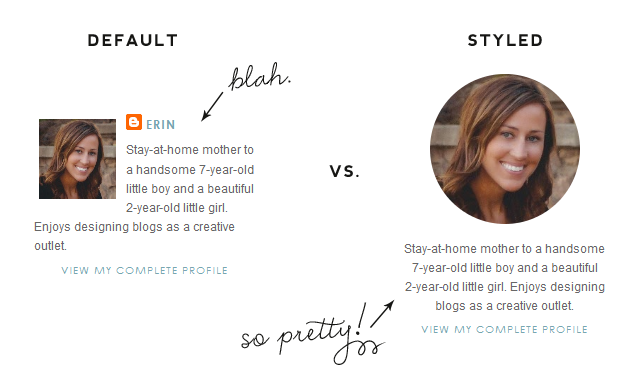
We’ve been getting a lot of questions lately from our $15 template clients about how to configure the about me gadget, so we thought we’d explain how to configure the profile gadget in a tutorial today.
Step 1: Add Profile Gadget
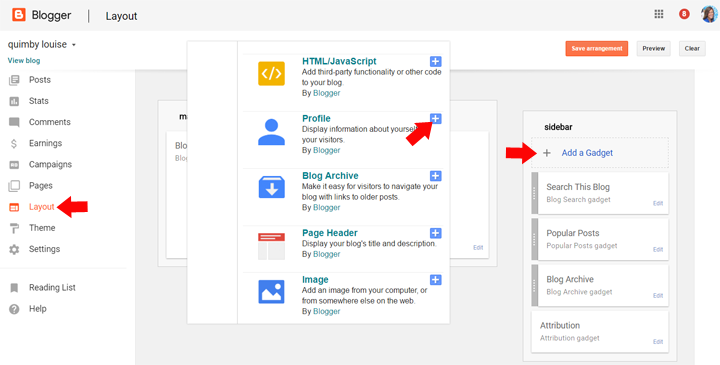
First, you need to add the profile gadget to your sidebar. You do this by going to Layout and then clicking Add a Gadget. Then scroll down until you find the Profile gadget. Click the + to add.
RELATED POST: How to Add Gadgets to a Blogger Sidebar
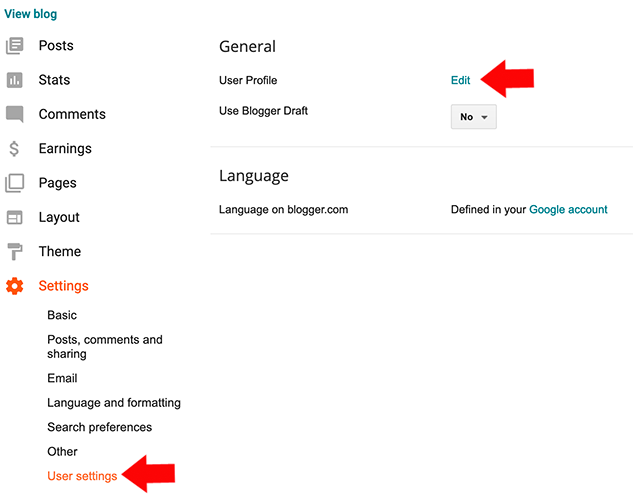
Step 2: Add about photo and text
To add your profile photo and bio info, go to Settings > User Settings > User Profile > Edit. The page that opens will show an overview of your profile.
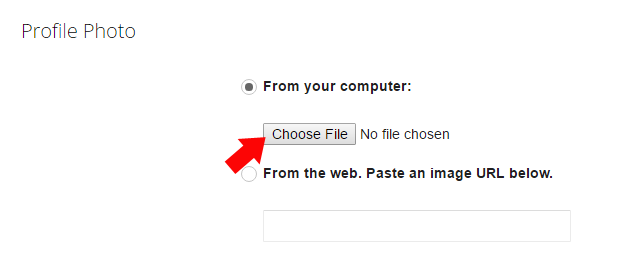
To change/add your profile photo, scroll down to the Profile Photo section. This will allow you to upload a photo from your computer or you can insert the url to your image if hosted somewhere on the web. If you are not currently using a photo, click the Choose File button. If you are currently using a photo and want to change it, click the Remove image button and then click the Choose File button to find your new photo.
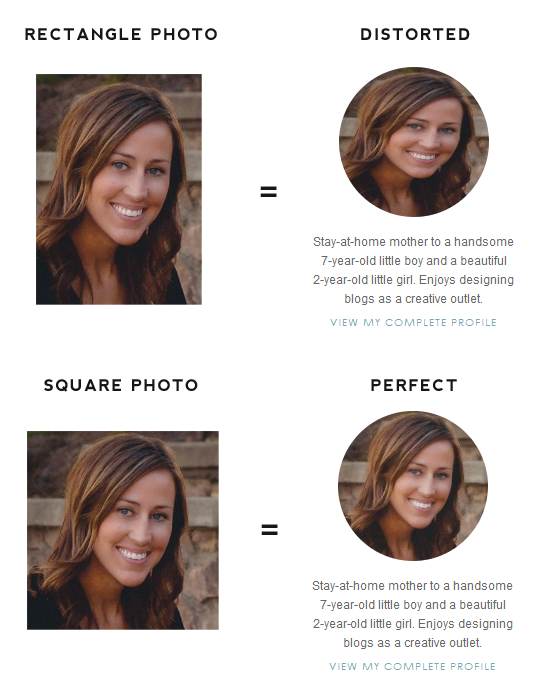
IMPORTANT: Make sure the image you upload has been cropped to a perfect square or it will appear distorted. We recommend making sure your photo is at least 500 x 500px.
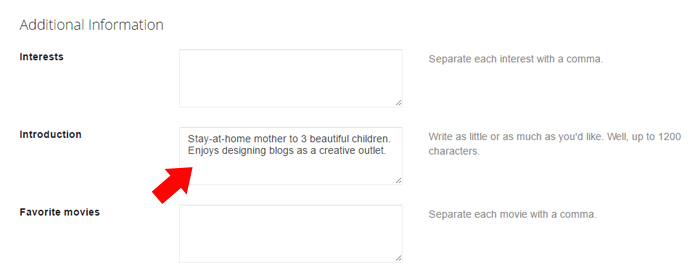
To add the text that will appear under your profile photo, scroll down to the Additional Information section and edit the Introduction area.
Save Settings button to save your settings. Then view your live blog to see your beautiful new styled profile area!
RELATED POST: How to Resize Blogger Photos Automatically
Troubleshooting
1. Blogger Profile is not showing after following all of these steps.
2. You’ve followed all of the steps and your photo is blurry.
All of our current Blogger templates have coding that will prevent blurry profile photos, but if you have an older template installed, Blogger may resize your profile photo automatically to 80×80 pixels. It then blows the picture up and pixelates it. There is a fix. Go to Template > Edit Html. Click your cursor anywhere in the code box and hit Ctrl/Command + F to open a search box. Search for this:
</body>
Now paste the following code directly BEFORE that closing </body> tag:
<script type="text/javascript">

var img = document.getElementsByClassName("profile-img");

img[0].setAttribute("src", img[0].getAttribute("src").replace(/s\B\d{2,4}/,'s' + '256-c'));

</script>
Hit “Save template” and the blurriness should be fixed. If not, let us know!


I just bought one of your blog designs, and cannot for the life of me get my profile to appear under the “about me” section of the sidebar. I’ve gone through the steps listed here, but still, nothing appears. When I click on the profile widget box, it says configure profile, but I can’t click on it or anything. Any suggestions for how I can fix this?
Hi Claire,
We just sent you an email in response to this. Fix for others having the same issue is to make sure you only have one contributor/user on your blog. If you have more than one contributor listed, the profile gadget will not know which of them to use and will not display at all.
I have followed your tutorial above and checked I’m the only contributor/use on my blog. Yet I still have the profile gadget displayed.
Any suggestions will be appreciated.
Thank you
Maybe I am missing it but I don’t see where the instructions above tell you how to make your profile pic a picture.
Just a suggestion since the sample $15 blog I purchased showed a circle profile in place, that should already be on the template. I was expecting it as a customer. Thank you!
Because the profile area is a gadget, you have to already have the profile gadget added to your blog in order for it to automatically appear when you install your design. If you don’t already have the profile gadget added, then you’ll need to add it after install in order to have the profile area appear. Step 3 of this tutorial explains how to add your profile photo to the gadget.
Hello,
I used your tutorial and the profile picture does not fill the circle. Could you please hep me fix this problem. I don’t know what I did wrong.
Thank you
Make sure the photo you are using is at least 500 X 500px and it should fill the circle nicely.
Thank you for your instructions. My profile pic is still a square and when I click on it the picture is blurry. What am I doing wrong? Thanks so much! Love Designer Blogs, have had my blog done twice by you!
Are you using one of our $15 Blogger templates? This tutorial only works if you are using one of our template designs.
I am using one of your premade blog themes. http://www.mamamostamps.com
Yeah, this tutorial will not work with a premade. It’s only for templates: https://www.designerblogs.com/blogger-templates/
THANK YOU SO MUCH! I am so happy. For the past month and half, I have been going crazy trying to figure out how to fix my blurry picture. I tried following the steps to change the template, but for some reason I don’t have the “revert to Blogger profile” option. So I followed the steps to edit the HTML code and it worked! I wish I knew earlier to seek help from Designer Blogs because I spent countless days searching how to get my picture to look normal again. Thank you once again!!!
My photo has been blurry ever since I put it in the this template. The circle has made it very blurry. I have tried all of the above tips bit none has worked, is there anything else I could try? And thank you for your lovely designs.
Hi Ophelia, I will have the designer of your design contact you directly to try to resolve the issue.
I am having the same issue as the above poster. I have tried everything and it is still blurry for me as well.
I will have the designer of your template get in touch with you to help you resolve the issue. She’ll be in touch shortly.
I too am having the blurry photo issue still. Image is square, sized at 500×500 taken with a DSLR Camera. When I Ctrl+ F and type in it comes back 0 of 0. Thanks in advance for creating this page for help.
Try again. Your code will have the closing body tag
. Once you find it, then copy/paste the code from the tutorial just before that and it will fix the issue.Perfect – this was exactly what I was looking for. Thank you!
You are very welcome! Enjoy your pretty photo!
This has a been a great tutorial! Thank you so much for your awesome blog layouts and amazing tutorials!!
Thanks Cayte! We’re glad you found it helpful. Enjoy!
Thank you so much for your lovely designs all the helpful hacks! Totally loving the template I purchased!
Thank you so much! I spent so much time trying to figure this out. You had super easy instructions to follow and now my picture isn’t blurry 🙂
I followed the instructions for the picture (used perfect square), as well as edited the html so it wasn’t blurry, but the picture is a weird squished oval shape, not a circle. Any suggestions?
The information text is also not showing up under the photo. How do I do that? Thank you!
Did you enter in your text as explained in Step 3? If so and it’s still not showing, please send over your blog link to us as [email protected] so we can trouble shoot the issue.
Please email us at [email protected] with a link to your blog and we’ll be happy to troubleshoot the issue.
I’ve done everything, but my profile still isn’t showing up at all.
Do you have 2 users set as administrators? If so, the profile gadget won’t work/show because it won’t know which of the two to use. Set your blog to only have one administrator and then your profile gadget will show. Let us know if you have further issues.
I dont have the little gear button…do we know why? I have seriously read this over and over and im getting to frustrated. Pleasee help
Are you using one of our $15 templates? You have to be using one of our designs for this tutorial to work.
This is an awesome tutorial but for some reason my blogger account doesn’t have the settings option beside the search 🙁 do you know if things have changed since you have written this post? I can’t find anything as helpful as your post!New follower now for sure! 🙂
It looks like they have changed it since we posted this. It looks like you can now find switch profiles by going to Settings > User Settings > User Profile and selecting the profile you wish to use there.
THANK YOU FOR PROVIDING SUCH A GOOD INFORMATION.
Thank you for this tutorial Erin!
Hello, thanks for the valuable info. I want to show the blogs I follow under the “About Me” in my Blogger profile. Can you share tips on how to do that? Thanks again.
Please read this guide; it should help you with the question.
I was helping a friend with her Blogger blog and she invited me and made me an admin. But now my name is showing in the About me gadget. Is there a way to remove my name, but keep the gadget with her name?
The profile blogger widgets show all the authors. I would recommend just removing yourself from her blog once you will be done. If you want to stay as an author on her blog, create a profile section manually by adding an image widget with her photo and a text widget with a short bio below.
THANK YOU! Was pulling out my hair, trying to fix my husband’s blurry profile photo. Your help fixed it!