Adding pages (aka: a navigation bar or menu bar) is a great way to organize your blog to make important information easily accessible to your readers.
Designer Blogs offers several types of navigation bars. These navigation bars are customized to give your blog a unique & professional look and can be purchased through our accessories shop.
However, you may just want a basic, non-customized Blogger menu bar, so today we are sharing a tutorial that explains how to get pages and a basic navigation bar added to your Blogger blog all on your own!
Steps for adding pages to your blog:
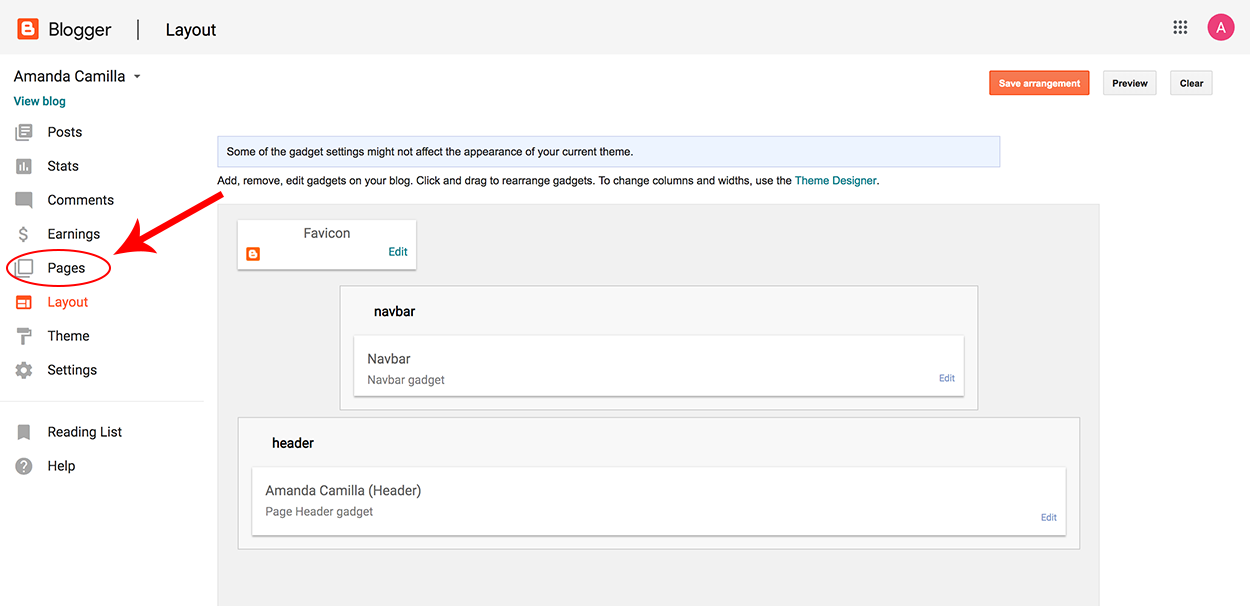
Step 1: Log in to the Blogger blog you are wanting to add pages to and click on the “Pages” link.
Step 2: Click the “New Page” button.
Step 3: Type the page title (this will appear as a link on the navigation bar), add the page content and then click “Publish.” Note: make sure the page is published or it will not show on your navigation bar.
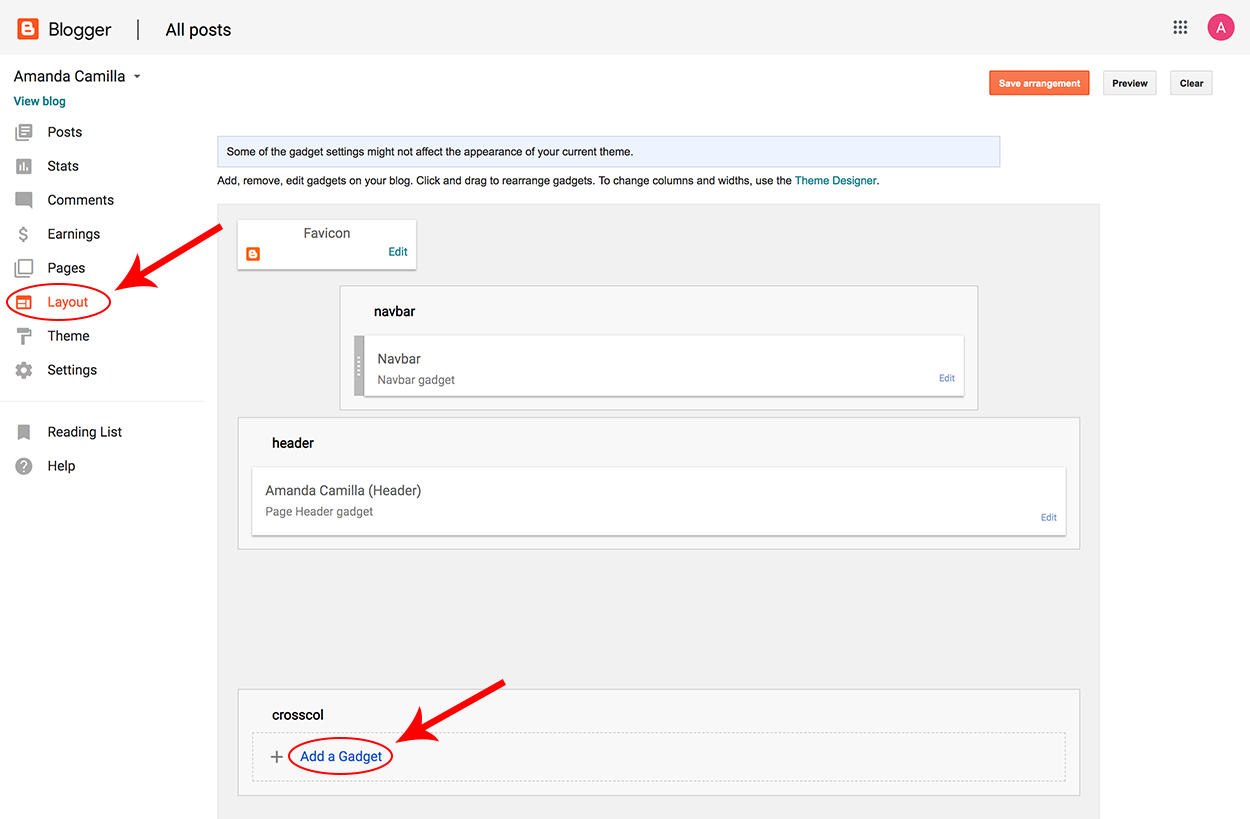
Step 4: After your pages are published, you need to add the Pages gadget to your layout to make the categories appear on your blog. Go back to “Layout” and click on “Add a Gadget” in the space underneath the header. Note: If you want your navigation bar placed on your sidebar, click on “Add a Gadget” in the sidebar space.
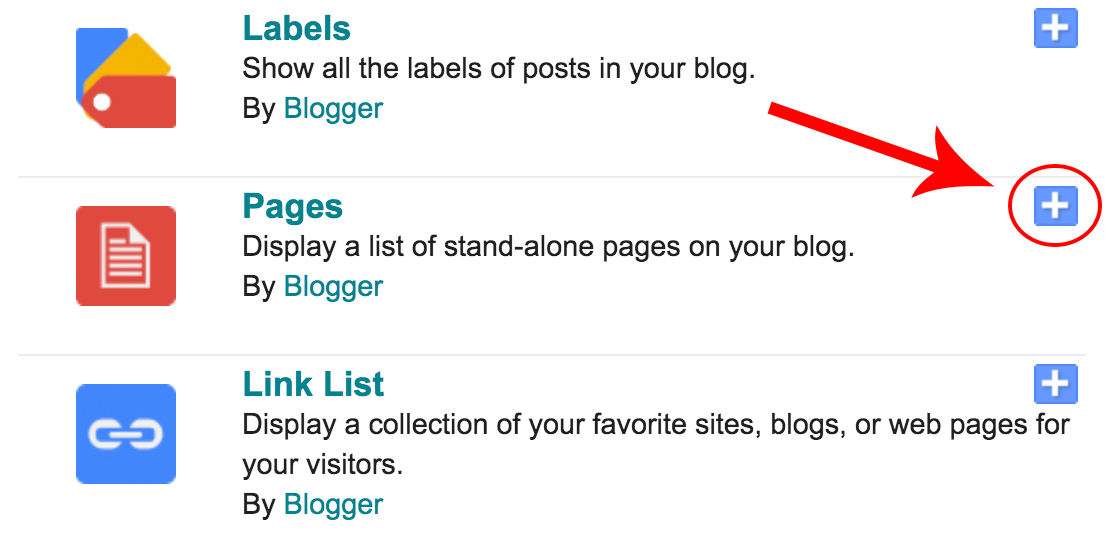
Step 5: Choose “Pages” from the list of gadget options.
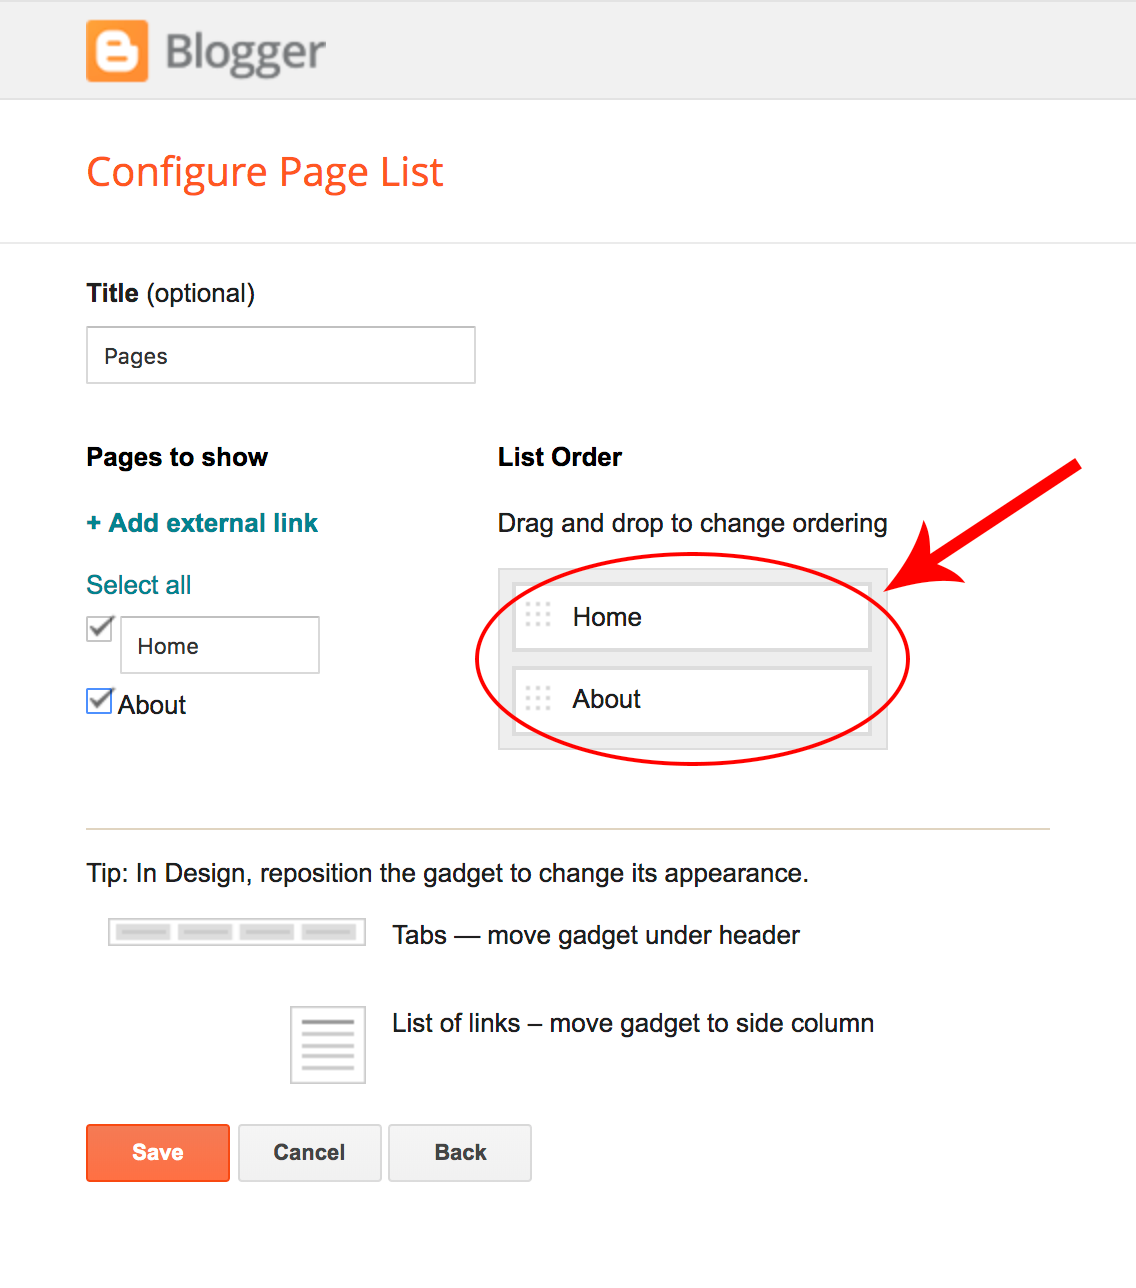
Step 6: Drag and drop your pages to rearrange them in the order you want them to appear and then click “Save.”
Adding a web address to your navigation bar:
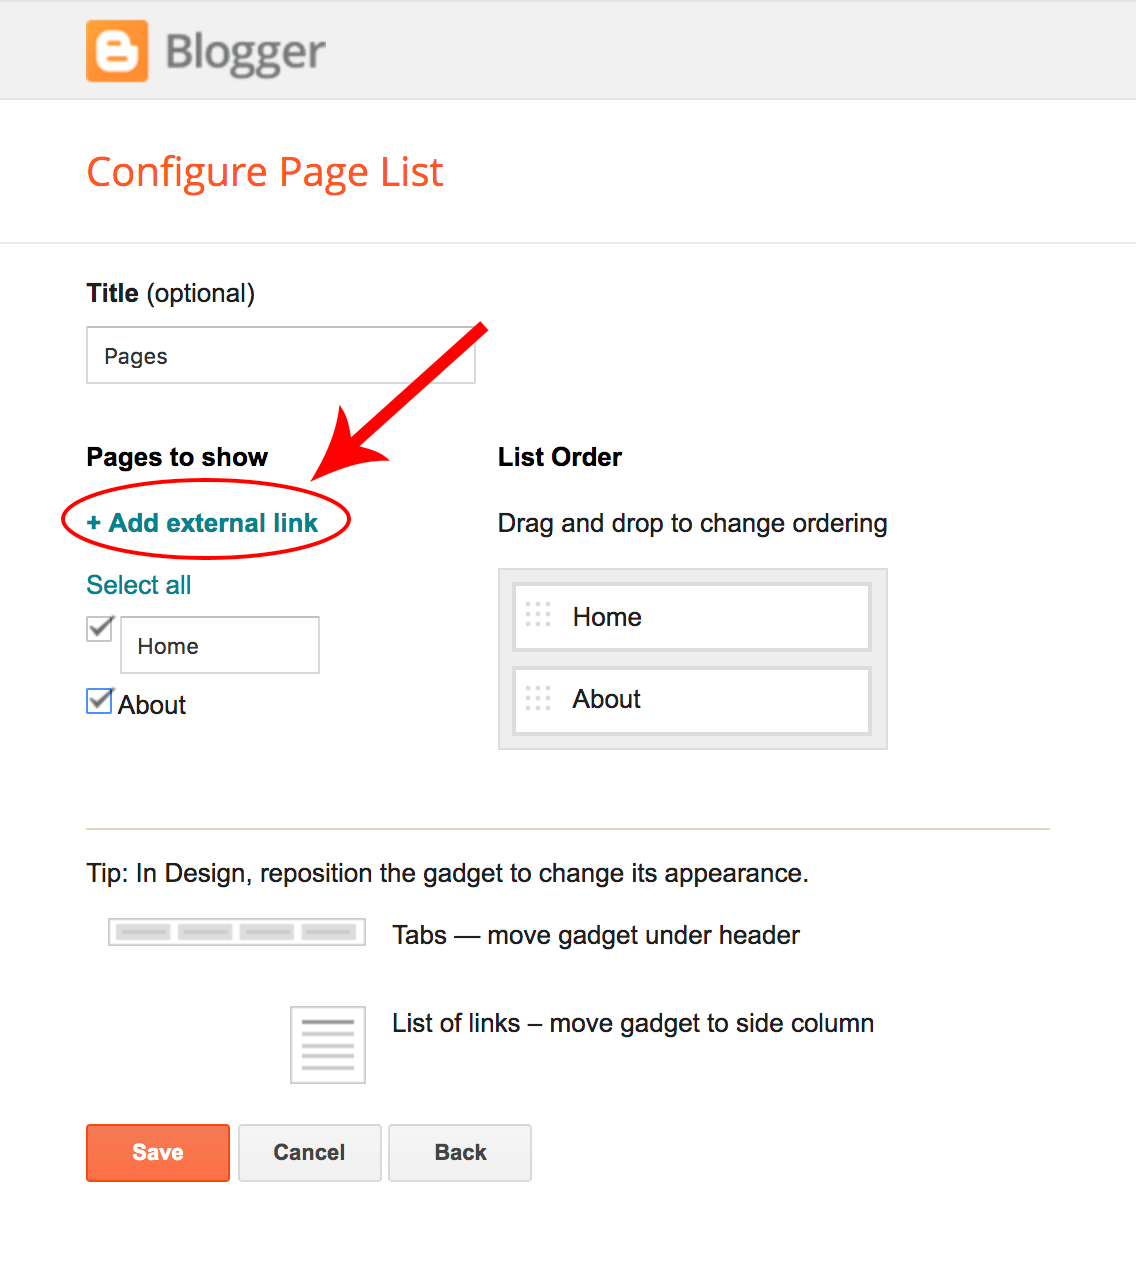
Step 1: You may want to add some web addresses or links to labels along with your blank pages. Click on the “Pages” gadget and choose “+ Add external link.”
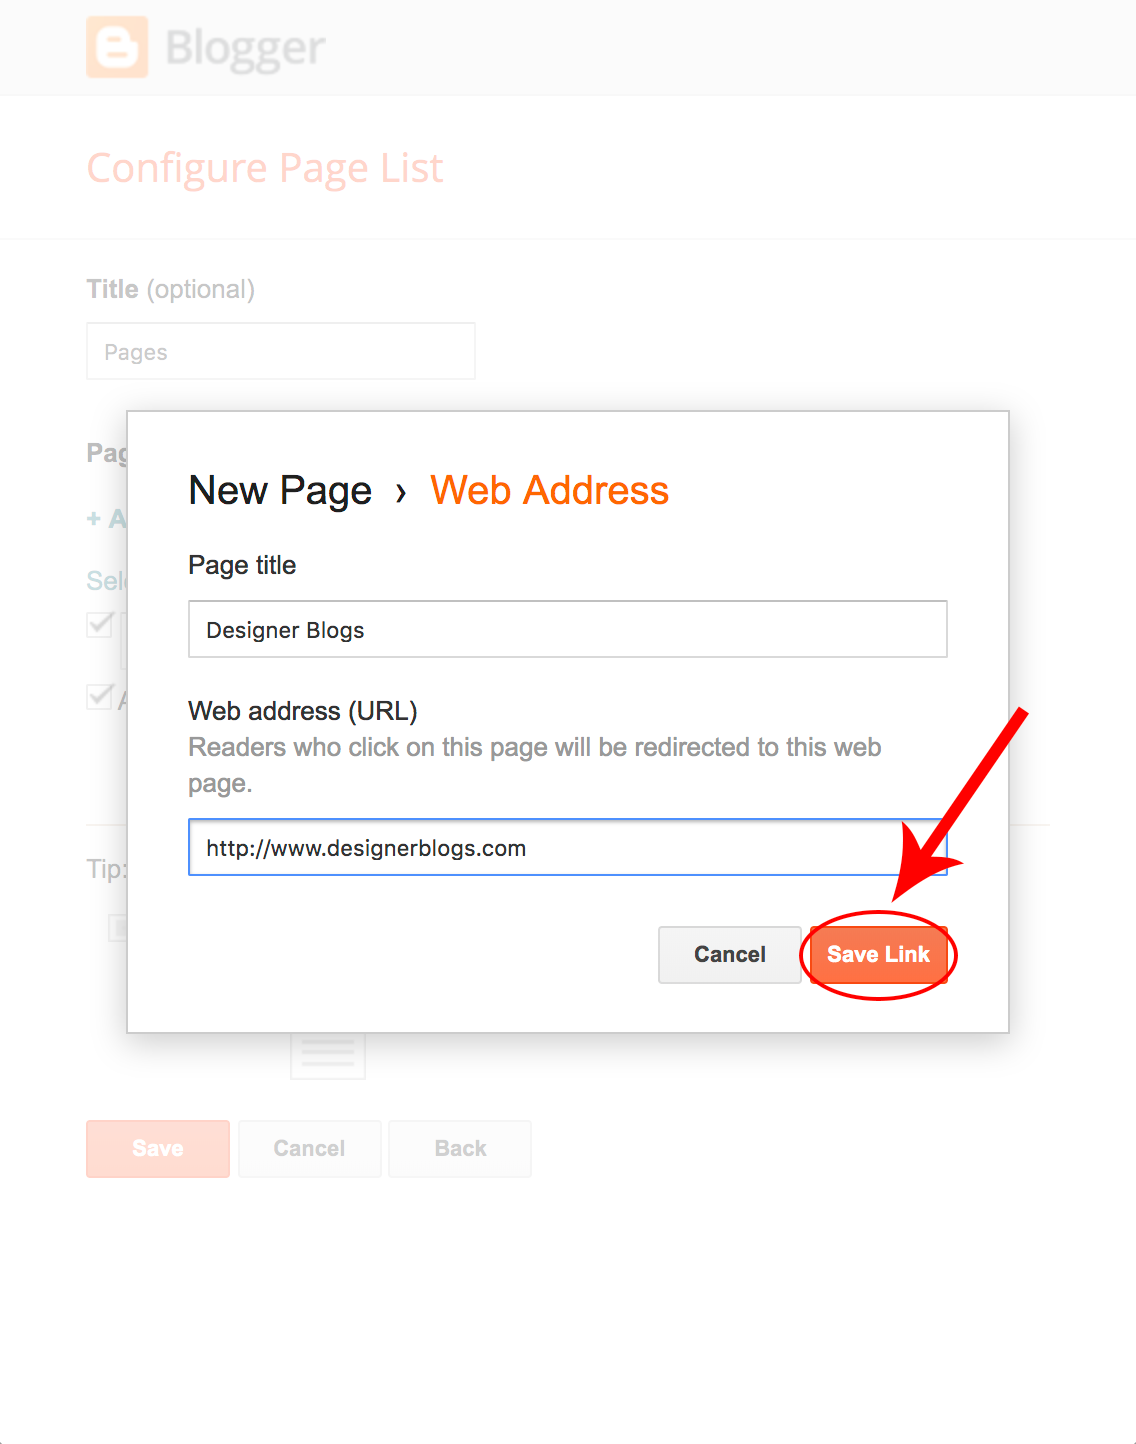
Step 2: In the first box, type the title you want to appear in the navigation bar. In the Web address (URL) box, insert the web address you want to link to. Then click “Save.”
Now view your blog to see your new pages and navigation bar!
RELATED POST: How to Link a Menu Bar Link to a Label or Category
For adjusting left aligned navigation menus
If you have a blog template with a left aligned navigation menu and you would like to adjust the positioning of the links, follow the below steps.
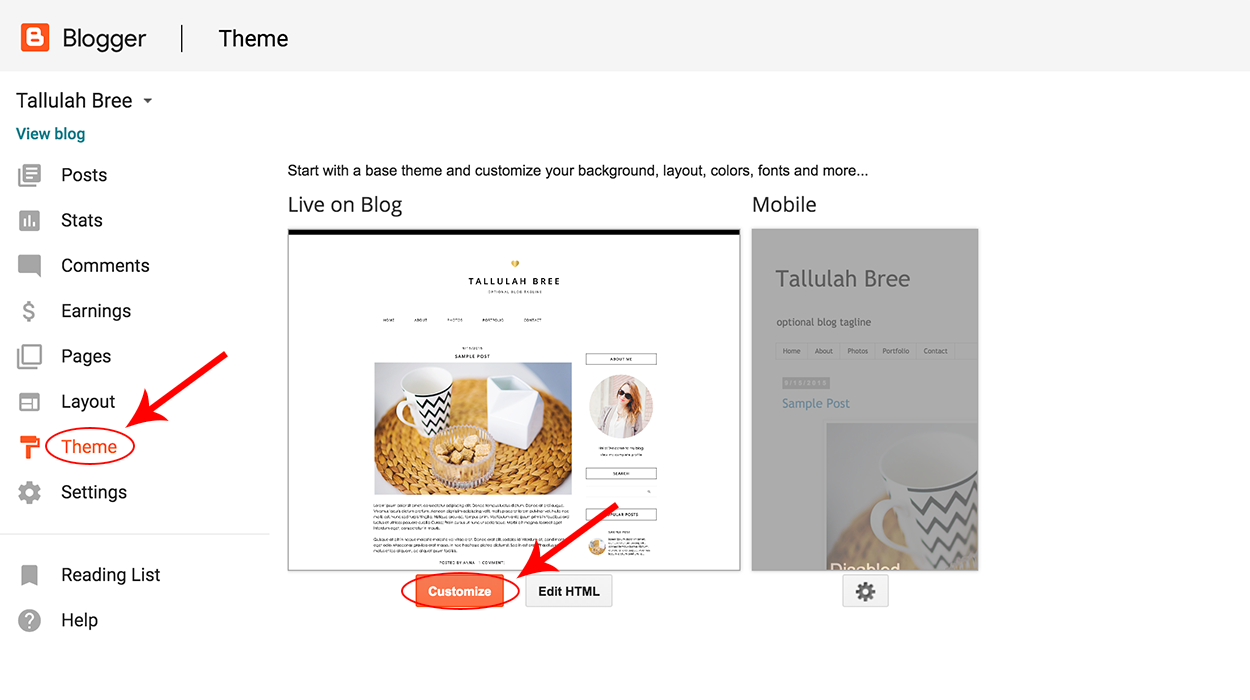
Step 1: In your dashboard, click on the “Theme” link and then click on “Customize.”
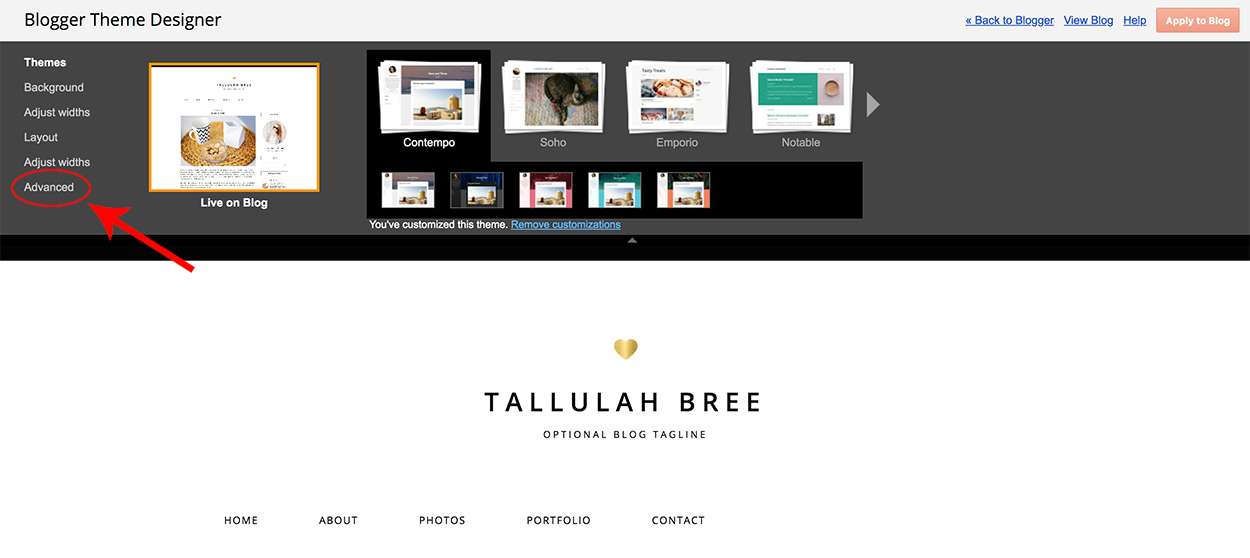
Step 2: In the Blogger Theme Designer click on “Advanced.”
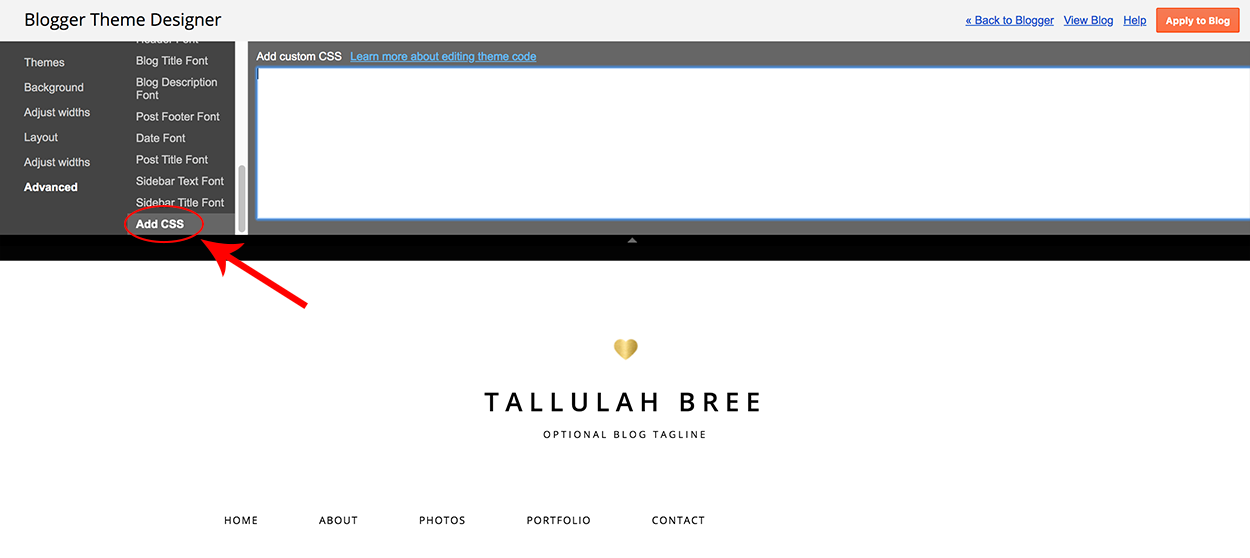
Step 3: In the “Advanced” tab, scroll down until you find “Add CSS.”
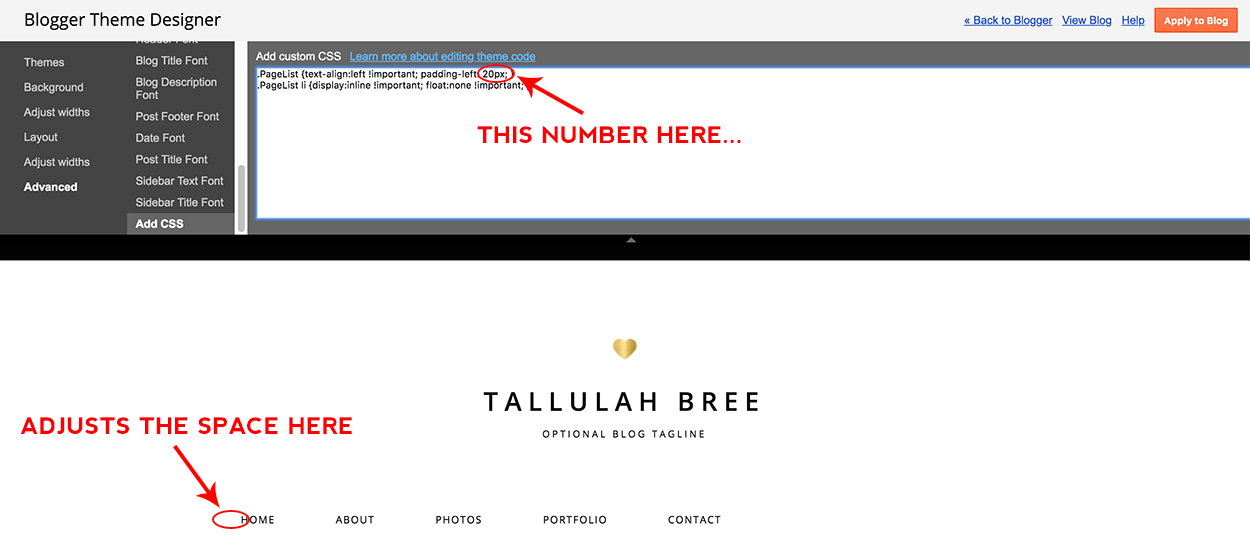
To add more space to the left side of the navigation bar, add the following code:
.PageList {text-align:left !important; padding-left: 20px; }

.PageList li {display:inline !important; float:none !important; }
You will see a preview of how the design will look with the changes. If you adjust the “20” to a larger number it will add more space. If you want less space adjust the “20” to a smaller number. Adjust it as you want and then click “Apply to Blog” to save the changes.
Example:
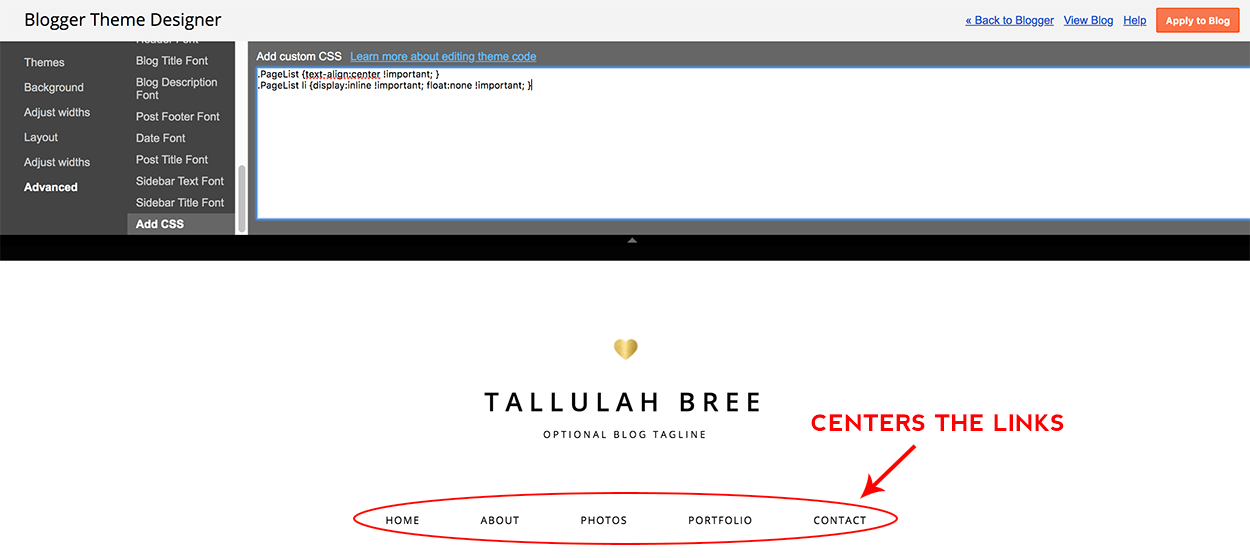
To center the links, add the following code:
.PageList {text-align:center !important; }

.PageList li {display:inline !important; float:none !important; }
You’ll see a preview of the changes. If you are happy with the way it looks, click “Apply to Blog” to save the changes.
Example:
For any further customizations you might need made to your navigation bar, you can visit our add-on shop to purchase one of our navigation bar options.
Please feel free to leave a comment or contact us at [email protected] with any questions you may have.





Thank you so much. This is wonderful. I went and worked on all of my blogs so now it will be easier for people to find the info they are looking for.
Is it possible to transfer existing post to new pages I have created.
The only way I can think of to transfer an existing post to a new page would be to just copy/paste the info from your post to your page.
You can also link back to the Labels.
Oh… Thanks a lot… Well informed
I am having issues posting on pages from your premade designs. Any suggestions?
I love your tutorials! I'm a newbie and I'm wondering is there a way to put post dividers INSIDE the pages? I know the main page does it automatically but the pages it seems as one very long post…can I change that?
You would need to manually insert the post divider code into the html of each page.
I have a question. I want to use a page like the one you created to post recipes. I don’t want the page to be static. I want to have the same functions as the home page. Is that possible with blogger? Thanks Gin http://www.fashion4therealpeople.blogspot.com
Hi Gin, unfortunately that would not be possible with Blogger unless you simply linked the recipe navigation link to your recipe labels link. That would then show a long blog like list of all of the posts you’ve added the recipes label to when the recipe link is clicked on. Hope this helps!
Hi, How would I do something like ” linked the recipe navigation link to your recipe labels link” so that it would “show a long blog like list of all of the posts you’ve added”
Thank you very much!!
We will be posting a tutorial about how to do this tomorrow on our blog, so check back tomorrow for the instructions.
Here’s the link to the tutorial that explains how to add menu links to labels: https://www.designerblogs.com/how-to-link-a-menu-bar-link-to-a-label-or-category/
It ís difficult to find knowledgeable people for this topic,
but you seem like you know what youíre talking about! Thanks
This is exactly what i was looking for. Thoroughly and accurately explained each step. Thank you very much.
I just found that there’s a problem for adding the page. Last time, I can do so (just like what you teach). But today, the add page “web address” was no more.
And, after I add a page in “blank page“, there’s nothing appear in my blog.
It’s so frustrated!
It looks like Blogger changed things yet again! Very frustrating for us as well. We will post a way around this as soon as we can figure it out ourselves. 🙂
Blogger recently changed the process for adding pages. We have updated the tutorial to reflect the changes and it should work great for you now.
unable to do step no 2. in my blog while doing step 2 drop box is not appearing. blog is directly directed to a blank page option.
It appears Blogger just changed things again. We will post a solution as soon as we can find one.
Blogger recently changed the process for adding pages. We have updated the tutorial to reflect the changes and it should work great for you now.
Guy, it dose’t work for me. pls help
Blogger recently changed the process for adding pages. We have updated the tutorial to reflect the changes and it should work great for you now.
I can’t for the life of me figure out how to get the page I just added to appear on the navigation bar. It’s supposed to do so automatically, but nope. Is there something wrong with me? From the recent comments it seems like something might be screwy with blogger.
Miles – Blogger recently changed the process for adding pages. The tutorial is now updated.
Thanks for sharing with us this great tutorial. I’ll be back for some great tips…
thank you so much, it has been very helpfull!
…but for make a bar with custom buttons, how could i do that?
(sorry if my english is not perfect)!
You would need to order a navigation bar with custom buttons from a blog designer. We offer this option through our blog accessories shop for $40. Select the “NAVIGATION BAR W/CUSTOM BUTTONS = $40” option.
https://www.designerblogs.com/services/blog-accessories/
Thanks for the update! Is there code for CSS for changing the font and font size? Thanks!
Hi Rachel,
You can change the font size by adding this code:
font-size: 17px;
Adjust the number (17) larger or smaller depending on how large or small you want the font to be. Your new code with this added should look like this:
.PageList {text-align:center !important; }
.PageList li {display:inline !important; float:none !important; font-size: 17px; }
To change the font, you would need to use the instructions for adding Google Fonts: https://www.google.com/fonts.
Then you would add the font code it gives you to the code like this:
.PageList {text-align:center !important; font-family: ‘Raleway’, sans-serif;}
.PageList li {display:inline !important; float:none !important; font-size: 17px; font-family: ‘Raleway’, sans-serif;}
Hope this helps!
Hi Lauren,
Thanks for the update. My problem is I know how to link the pages to the pages in my template but I don’t know how to hide the pages once its linked. Blogger use to give you the option to hide them once linked to the template. Do you by any chance know how to do this. I don’t want to use the blogger navigation, I want to link it to my template then hide the blogger buttons.
thank you for your help
Christa
You can go to Layout and then just delete the pages gadget and then the menu bar will no longer show but the pages will still exist.
That is what I was looking for from a long time. I have found some same tips on other blog but they were not sufficient to learn how to add the pages to blog. But in this blog everything is perfectly described.
I am just crazy for this blog and love you a lot.
Thanks
Very easy to follow instructions … and very useful indeed, this is what I was looking for as I did not understand the Page concept in Blogger. Thank you so much. i will publish this feature as soon as I am ready with the information. Once again a big Thanks!
Hi Lauren,
I would like to make my menubar just like this one: http://hackaday-thema.blogspot.gr/
Can you please help?
Thanks
Yes we can do something like that for you. Visit our blog accessories shop and purchase the “navigation bar w/custom buttons = $40” option. Hope this helps!
Hi , I have tried following these steps but it doesn’t seem to be working…Some pages are not being posted and when I have managed to, when I click on it the content does not change?
Thanks
Great tutorial . Thanks 🙂
thanks for your help!
Hi! I used this for my blog. Thanks for the tip. 🙂
This is good tutorial. I followed this tutorial. I have created label for some post of my site http://www.abhilashatechnology.com and then trying to create web address page. But for me it is blank page is getting created. As here it shown you can create either blank page or web address page. Your answer is appreciated.
THANK YOU SO MUCH FOR THE TUTORIAL! VISIT MY BLOG PLEASE
thanks
Thanks for a helpful and dynamic blog.My question is about amount.
I have seen both 10 and 20 given as the maximum pages allowable. Which is correct?
Is there a limit to the length of a page. Is it literally a “page” or can it be a lengthy piece of writing? If so, how long?
You can create 20 static pages on Blogger blogs. I don’t believe there is a limit to the content length of each page. Hope this helps!
Hi,
Thanks so much for this tutorial! While I have pages on my blogger, unfortunately, only SIX can fit across horizontally at the top of my site without the seventh page becoming a second “line” or layer underneath (and “centered” too). As a result, this looks unslightly, so I’ve had to put a few different – important – pages in DRAFT and only keep the absolutely necessary ones published.
I’m guessing I just need to try to make more space along the width of my site/template in order to allow for all the pages to show up in one row, but I’m not sure how to do this. Also, I’m wondering if this might be more difficult because while I did try to follow this tutorial and go to advanced template to mess with the CSS code, I had purchased a pre-made blog, so there was already a CSS code in there + I was afraid to change it.
Help? 🙂
hi! thank you a lot!!! I have a quastion I want the new pages to publish articles how i will do this? I hope to understand me 🙂
You would have to add the articles manually onto each page.
Thank you so much for this easy to follow tutorial!
This is such an easy tutorial to follow, just what I needed! I was wondering if you could also tell me how to get rid of the lines around the page names. I would like a more clean appearance. Thank you so much for your help.
Honestly, I could find this almost everywhere but the way you approached it made all the DIFFERENCE! Here is what you made me attain—-www.hereweask.blogspot.com
From Kenya.
This was a great tutorial, it really helped allot! I have one further question. How do you link your labels to the pages on the top of the blog? Say I wanted a DIY page, I want to click on that page at the top and be able to see all of my DIY posts in the same place. Some advice would be greatly appreciated!
Thank You!!
Michelle
Michelle, this tutorial should answer your question: https://www.designerblogs.com/how-to-link-a-menu-bar-link-to-a-label-or-category/
Hi, the pages link are still not appearing on my blog’s page list. I just recently purchased blog templates and I’m trying to re-organise my blog. If you click on my website and click “About Me” it just keep directing me to blog not the page i created. the templates are very pretty! Cheers
This is so helpful! I have been looking for a long time how to make the pages
Awesome tutorial…. thanks to sharing with us.
Thanks for sharing these steps to add a page in blog. Currently i am working on http://resumeon.blogspot.com and i will try these steps.
Thanks for making this steps so easy, i works for me and i am so happy
Thank you very much for sharing a very nice tips. I strongly believe this tips will help many young blogger.
Many many thanx! i have done it now. I had to wait more then a year for this but now i made it with the tips of this tutorial. thank you again.
thanks for the tutorial
dostechinfo.blogspot.com
hi,
Just want to know if there’s any scope to add sub-page under a page ? For example, blog, If I wish to add some more pages under a page as sub-menu/page, is it possible ? Tried to do that from Template editing but can’t find out the name of the pages.. If someone can help me…. Thanks in advance. Jay
Hi Jay, adding sub-pages has to be done manually, meaning it has to be hard-coded into the design. You can purchase this option through our blog accessories shop. Select the “NAVIGATION MENU W/DROP-DOWN CATEGORIES (BLOGGER) = $75” option and a designer will be in touch to get those coded in your site for you. Hope this helps!
Thank you so much! This was the most helpful post on fixing page titles I’ve found on the web so far! 🙂
This post is really helpful, I am currently working on my blog http://peacefulmindbody.blogspot.com This post will help me to create pages easily.
Thanks!
Hi,
I want to add pages to my blog but I don’t want the pages to have the same gadgets as the home page of my blog. Is that possible?
Thanks!
Maureen
This is possible but only if you are on WordPress. Hope this helps!
thank u very much for sharing such a nice tutorials . I am following your tutorials to build a better blog for my online income . Here is my blog link TSD
Thanks a lot for the useful information. Is there any way to fix the tab bar so that when scrolling down the page, tabs would always stay at the top of the page?
Thank you.
This is something you’d need to purchase from our blog accessories shop. Select the AVIGATION MENU W/SIMPLE TEXT LINKS = $25 option and note that you are wanting the menu bar to remain static. Hope this helps!
Yaa! Smart, easy and clean delivery! thanks.
This article is very helpful for me . Thank you
thanks for such a detailed guide. its hard to find guides other than wordpress.
Your blog is a lifesaver
Glad we could be of service. 🙂
Thanks for the great tutorial. Im new at blogging and still learning the ropes through sites like yours =)
Welcome to the wonderful world of blogging Esme! We hope our site helps you learn the ropes!
very comprehensive resources.Thanks Erin!
Thank you for this, it has helped me finished About me page on my blog: http://www.gleeoflife.eu. Than you, very helpful! 🙂
There’s certainly a great deal to know about this subject.
I really like all the points you made.
I just recently purchased blog templates and I’m trying to re-organise my blog.
Great to hear! We hope you find this tutorial helpful. 🙂
Thanks a lot. Very helpful.
Thank you for the tip.. I liked it.. 🙂
easy to follow step by step approach=)you won’t get lost!
I am not seeing the “Add a gadget” tab under my header. I am only seeing “HTML/JavaScript” Can someone assist me please.
You may need to first add the pages gadget to the top of your sidebar and then drag that gadget up under the header gadget and a new gadget area will appear. Hope this helps!
Excelent information
Thanks for the detailed steps for adding pages to your blog.
I am beginner here and it really helps me a lot in adding pages to my blog.
Thanks,
Sumit
http://www.digitalsumit.com
II purchased a blog template that already has a list of items on the nav bar,and want to post on those specific items (about page etc…) Would I still have to add a gadget and a page?
Basically my template already has “about” and other items on my nav. bar. I don’t want to add an “about” page and have there be two about pages. Does this make sense? Thank you for your help. Great site!
Your existing menu bar will carry over to any new designs that you purchase from us. You can create only the pages you want to use. Hope this helps!
Thank you for the tutorial. Very helpful. As a beginner I have a stiff learning curve ahead of me. Question: How do I eliminate the duplication of the page title onto the top portion of my static page? My blog is http://elderkanar.blogspot.com
Congrats on Elder Kanar’s mission call and best of luck to him! I’m not seeing duplicate page titles when viewing your blog. Were you able to fix the issue?
Thank you so much
You are probably tired of answering questions about this considering you published this years ago! I have created my page and I successfully added the page in the cross-column section in the Layout section. The page appears on my blog, however, when I click on it, it does not go anywhere. I also cannot figure out what the link is to the new page. Any suggestions would be helpful!
Hi Phillip, we’re happy to try to help you. To find out the link to your new page, go in your dashboard to Pages. Find the page you are wanting the link for and click View under that page. That will open up just that page. You can then copy the url from the address bar and that will give you the direct link for that page.
Then go back to Layout and click Edit on your Pages gadget. Click “+Add external link” and that will allow you link your page up manually. Paste the url where it asks for the web address and then add the title you want for the link. Click Save Link and that will manually add the page to your site for you. Then you can just go and remove the page from the menu bar that isn’t working for you. Let us know if you have further questions.
Thanks so much ….it works for mee 101%..thanks
Very Informative. thanku 🙂
Hi there, Erin!
My blog is a customised theme that I coded, but I can’t seem to make Pages work.
I made a Pages titled About Me but when I click on “View”, it opens a new tab and it says
“Page not found
Sorry, the page you were looking for in the blog Layout does not exist.
Go to blog homepage”
So I was wondering if you have a solution for this?
So sorry, I seem to have nowhere else to turn to. Thank you so much! 🙂
Hi Anna! Thanks for your question! Make sure you’ve hit the “publish” button on the pages you’ve created. They won’t be recognized by your blog until they are actually published. If that doesn’t solve the issue, let me know!
What a nice post, it actually helped me. thanks
Helpful, thanks millions
Awesome post, Thanks for sharing useful informative keep sharing more information with us
Great post! Have nice day ! 🙂 ratju
Wonderful but is there any way i can make the pages appear on top of each blog post after using label links to form pages @ danglobal.blogspot.com
A great article indeed!
I have a question doing a post, Will i have to add a new pages or just use and existing page?
Love this blog.. It helps me alot
Thanks for sharing your useful information.
Nice tutorials
Nice post, Thanks for sharing useful informative keep sharing more information with us
Very Nice .. I love this blog and use it all instruction into my blogs which I made today ..
Wonderful Job ..
God Bless U
Hallelujah!
Hi thanks
But I have a problem…
I successfully added two navigation tabs but the third one isn’t complying… When loading it just blinks it then it doesn’t show
It may be something related to your design. Have you tried changing it to default one?
Hi,
Your blog is just amazing and I managed to add pages successfully reading the content from here. Thanks.However I’m in need for a fix. How do I reduce the white space above the links and below the header. I appreciate your help. Many thanks
If you still need any help with your blog code, please contact us at [email protected]
Hi, Thank you for the tutorial! It is very helpful 🙂
Would like to know…
If I choose the page title to show center under the header, how to adjust the distance between the “Page title”?
Thank you very much!
Hi Jiun,
If you still have problems with it please contact us at [email protected]
Thank you for providing these helpful hints. I’ll take your advice. very much appreciated
Hey………..
Thanks
Hi,
Your blog is just amazing and I managed to add pages successfully reading the content from here. Thanks.