Watermarks are those half-transparent images or texts which you can place over the photo to make sure that none will steal them. If you have a blog or if you post content online it is something you should learn. In this tutorial, I will show you how to add a watermark in Canva. It is easy and will take you only a few seconds.
What program should I use?
You can pick any graphic software to add your watermark; however, in this tutorial, I will be using Canva as it is one of the most popular free online tools.
With Canva, you will add watermark to your photos for free. With the convenient phone app included, you can post them to your social media directly from the Canva editor.
How to Add a Watermark in Canva
Before you start, make sure to prepare a photo you would like to use and a watermark.
Need watermark? Check our accessories shop.
For this tutorial, I will be using the following materials:


Feel free to save them and use them for training purposes. Once you have your photo and watermark ready, you can go to the Canva site.
#1 Create a new design
Log in to your Canva account and click on ‘create a design’ on the left.

Alternatively, you can use the search field in the center of the screen. Both options will show you available project types.
Feel free to pick any size you like. If you just want to add watermark to photo for a blog post, select a custom size image and set it to your photo width and height

Remember that with the free version of Canva, you can’t resize an already created project. If you need it to have a different size, you will need to create a new design.
#2 Upload your files
In the new window, go to the ‘Uploads’ tab on the left and add your photos by choosing ‘upload an image or video’ button on the top or by dragging images from your computer directly to the dark area under the button.
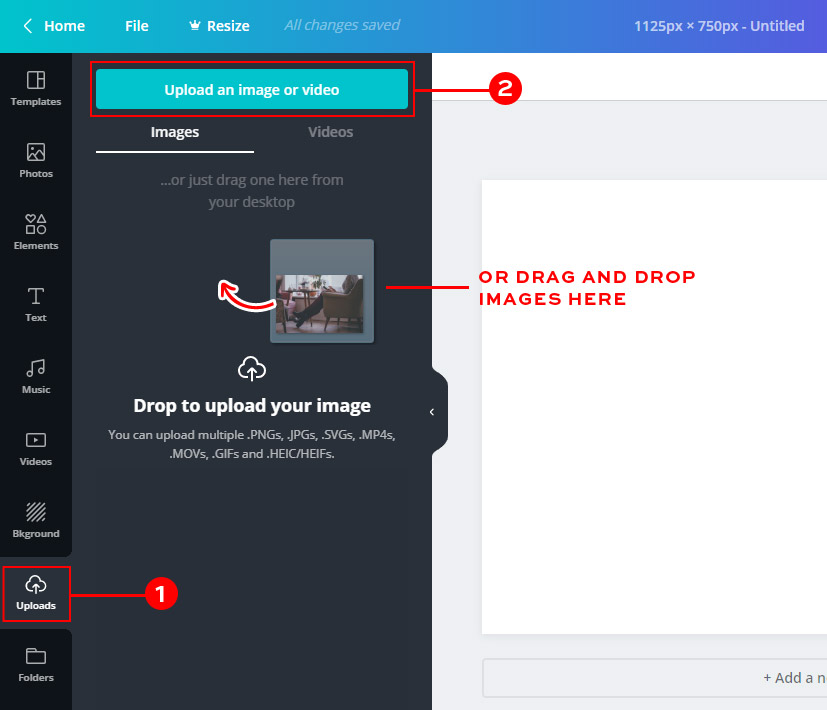
All uploaded files will be accessible from this place until you remove them. It means that you need to upload your watermark just once, and you can then use it for all your projects.
#3 Add a watermark to your photo
Drag and drop photos from the uploaded files section to the working area on the right.
If you want it to cover the whole area, make sure to drag it to the top before dropping it.
Now add your watermark. You can either click on in on the left upload files area or drag and drop it over your photo. Once added, move it to the desired place
#4 Change opacity
Watermarks are usually half transparent. When we create them for our customers, we save them that way to make the process faster for those who will be using them. If you created your watermark and it isn’t half-transparent, you can play with transparency settings in your Canva panel.
Make sure that your watermark layer is selected and navigate to the transparency button above your editing area.
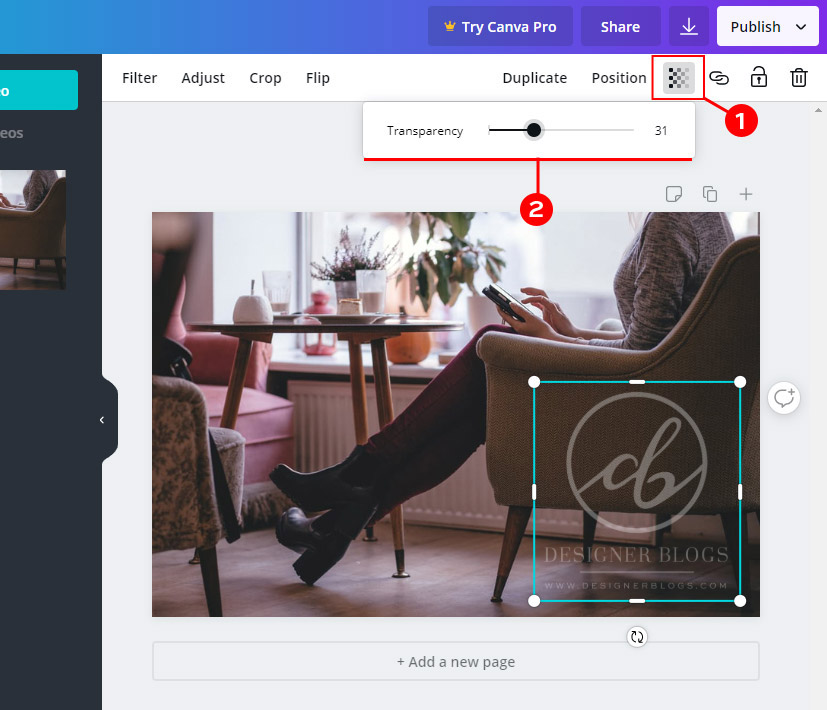
Use the scroll to set the transparency level. On the example above, I have set it to 31, and I think it works perfectly with the photo.
#5 Save your work
When a watermark is added to the photo, click on the ‘Publish’ button in the top right corner and go for the ‘Download’ option if you do not plan to publish your photo immediately.
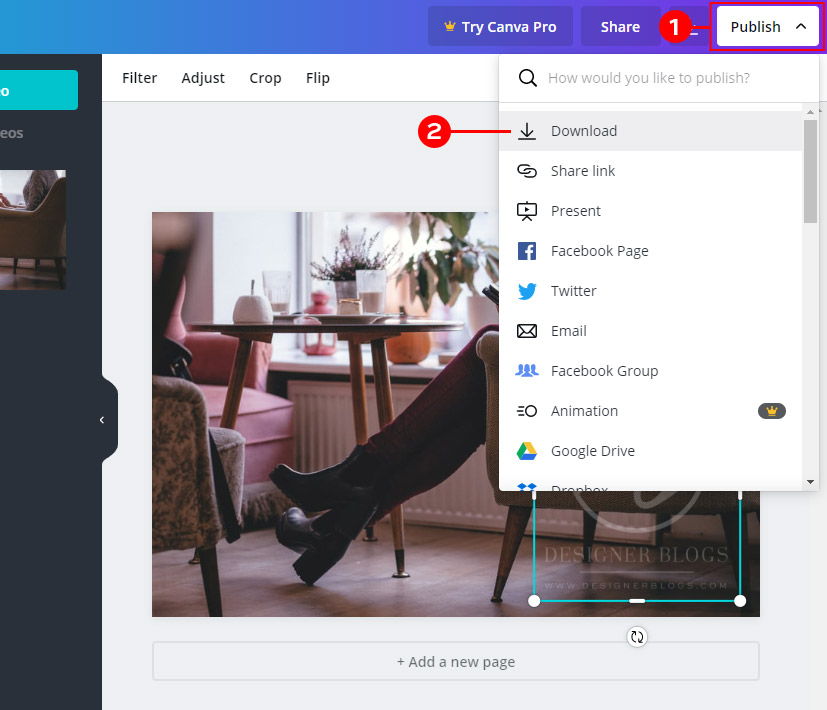
Canva will ask you for a few more details, to make sure the file is saved correctly. You can choose between various file formats. If you are working on a photo for your post, use JPG unless you do not care about the file size and want the images to be as good as possible. In that case, go for PNG.
I use JPG for all post photos and PNG for social media.
Here is how the final photo looks like. I have saved it as JPG with default Canva settings:

I hope the tutorial was helpful and you learned how to add watermark to photos! If you have any questions, make sure to let me know in the comments below.
Disclaimer: This post is not sponsored but contains affiliate Canva links. It means that we will get a commission if you will sign-up using them. It does not change our opinion about Canva or influence the way we work. I’m a big Canva fan for a long time, and I would recommend it to you anyway. Affiliate links help us grow, and clicking in them does not cost you anything. Thank you for your support!


Step 3 witch is the main reason this article was written does not have a image/prints creen or video showing how to add the WATER MARK,
It’s because that part is explained below the video in step 3 🙂 I made this section larger so hopefully, it will be easier to spot now!